Wednesday, January 2, 2013

Thrive Furniture Review - Grant Chair

Thrive Furniture's business model is essentially what every American company's should be: provide a reasonably priced, well made product that's made here in the US, ships for free, and includes free return shipping if necessary. Free return shipping! No restocking fee or fine print. If your butt doesn't like your purchase you just call and schedule for a truck to come pick it up and they'll take it back and refund your money, no questions asked. There's a limit of course to how long you can return a piece for free (7 days) but even if you exceed that time period you have a full year to return it and all you have to do is pay the return shipping and they'll refund your money. Pretty simple but pretty amazing.

So yeah, that philosophy combined with a 20% off Black Friday sale and I couldn't say no.

I ordered the Grant Chair and ottoman in Klein Granite and 3.5 weeks later it arrived at my door! Now, I didn't reach this decision easily - I'd been looking for a "chair and a half" for probably a year or so and had the hardest time finding one that was comfortable and reasonably good looking. For some reason all furniture manufacturers presume everyone wants fat, puffy chairs with rolled arms. The only other good looking chair and a half I could find was the Crate & Barrel Klyne Chair and a Half but upon sitting on it, I found it too shallow and the arms too high to really relax in. If it was more affordable I would have bought it, but at $1300 with the ottoman, it just wasn't worth the compromise.

BUT, good thing I gave Thrive a look and found their Grant Chair because its dimensions and comfort are truly perfect. I ended up with the standard chair (not the chair and a half) because it's plenty big for 2 people and their chair and a half model was HUGE! We're talking loveseat size and I definitely didn't want something so big. The proportions of this chair are perfect. So yeah, here are my findings:

Pros:
  • Very sturdy and well built.
  • It's wide so you have space for 2 people to lie next to each other comfortably.
  • The arms are low so you can hang over them or rest your head on them. 
  • Made with high quality materials.
  • It's deep so you have plenty of butt room and curl up room. Almost too deep - if I didn't have the ottoman I'd feel like a little kid dangling his legs over a too tall chair.
  • Looks nice and boxy and modern, not overstuffed and fluffy looking like most other wide chairs. 
  • Great for reading!

Cons:
  • The down back cushion is too thin and deforms too easily. It can be fluffed and smacked back into shape but it really could use some more stuffing. It's not very supportive - the cushion just forms to the shape of your back, rather than supporting it. You can't slouch too comfortably without putting some extra pillows in there.
  • The seat cushion (foam core wrapped in down) is starting to lose its squareness. The edges are no longer sharp like the arms and the back cushion. I've only had it about a month so I'm worried about its long term hold up.
  • The ottoman is almost too deep. It almost looks square. This isn't really a con since I have the room for it but it's something to note.
  • The chair is so deep that the ottoman has to be pulled right up to it for my legs to rest right. Doing this means there's no gap between the ottoman and chair so it's a little awkward getting into the chair.

Conclusion
I love this chair and it's the closest thing to perfect I'll ever find. Aside from the seat cushion deformation and back cushion flattening, the cons are very minor. Check out their website and buy something. The quality is definitely there and if you wait for a sale (most major holidays), their prices are exceptional for what you're getting.

Support a great American company... 


Update
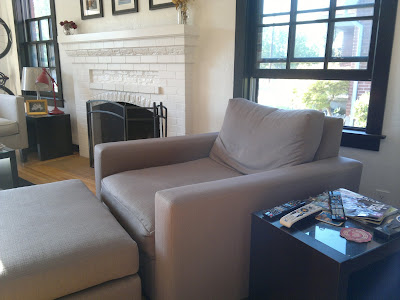
I've had the chair for over 6 months now so I thought I'd add a few pictures to show how it's wearing:

Back cushion looking a little sad from watching a movie in it last night.


You can also see how close I have to pull the ottoman to the chair. I'm only 5'8" though so maybe normal sized people won't have a problem.


Here you can see how the seat cushion has lost it's hard edges. This can't be smacked back into shape like the back cushion.


And here's what it looks like after I flipped the back cushion and fluffed it up a bit. Looks good but if you want it to look like this always expect to do this after every time you sit in it.

Monday, July 9, 2012

Bosch Dishwasher Review

I bought this dishwasher mainly because it was the only unit I could find that would fit under my 21.5" deep kitchen counter top and wasn't $1,000+. Also, I'd read good things about Bosch units and they're pretty sexy looking (yeah, dishwashers can be sexy). In all honesty, I'm ecstatic to go from no dishwasher to this one but for the price it could be better. If you don't have room for a full size unit, just buy a Bosch - you don't really have any other options except for super expensive slim models you'd probably have to import. It's not bad but it's not fantastic. If it were less expensive I'd say it was good for the price but Bosch products are no where near cheap and the build quality definitely doesn't reflect the price.

Pros:
  • Cleans dishes pretty well without precleaning.
  • Claims it requires a rinse aid but mine ran out a long time ago and I haven't noticed water spots.
  • True 22.5" depth (front of door to back of unit) means it will fit under shallow cabinets.
  • Sexy looking. 
  • Fairly quiet. For the price though I honestly thought it'd be quieter.
Cons:
  • Poor rack layouts. Top rack fits cups easily enough but the bottom rack is nearly useless for anything other than plates or small slim bowls. Works fine for just me but if you're a couple or family you'll be running a load every night and having to get pretty creative to fit everything in.
  • Long cycle times due to its environmentally efficient nature.
  • Much more expensive than it should be. 
  • Cheap feeling. The whole unit is made of plastic. The door doesn't have a release latch of any sort, it just pulls open. It does seal fine but sounds like something's breaking when you open it.
Conclusion:
Works well but has a terrible bottom rack layout. If you have shallow cabinets Bosch is really your only option but if you have standard 25" deep cabinets, buy something cheaper.

Pella Windows Review - Poorly Engineered


I'll expand more on this later but I am very disappointed with these windows. I wanted a double pane replacement for the original gridded double hung windows and i wanted it in black. That didn't leave me with many options. I went with the Pella Architect Series wood windows. They're wood windows that are aluminum clad on the outside and bare wood on the inside. The aluminum cladding can be painted pretty much whatever you want so I ordered it in black and knew I'd be painting the inside black as well so I ordered that pre primed. These were not cheap which was okay because the sample units appeared to be solid and well built and this is a pretty integral part of a house so I wanted a good product. Long story short, they did not live up to my expectations. Here are the pros and cons.

Cons:
  • No built in stops so if you raise the lower sash up all the way, the locking hardware will dent the upper frame of the window
  • The exterior grids bow and do not sit flush against the window panes.
  • The exterior grids protrude out further than the actual window frame of the lower (and upper) sash. Therefore they scrape the inside of the upper sash when raised. This only rubs a small portion on the inside but wears away the paint on the outside and makes the windows harder to open.
  • The locking tabs that hold the upper sashes in their track are too small, making them pretty much useless. This means with a hard pull you can pull the upper sash out of its track.
  • There's no way to pull the upper sash down without pulling down on the interior grids. These grids are not meant to be pulled on and will eventually separate from the window if pulled on too much.
  • One of my wider windows warped within a few months to the point where it wouldn't close all the way.
Pros:
  • They seem to block out heat and cold better than the single pane windows they replaced. Any double pane windows would do this.
  • They are fairly sturdy, aside from the above mentioned upper sash locking tab issue.
  • They block out noise pretty well. I can't even hear when it starts raining anymore.
 I'll go into more detail later but that's the quick and dirty. I spent a long time with Pella trying to work these problems out and they eventually replaced all my lower sashes but the new ones had the same issues so it really just boils down to shoddy engineering on Pella's part. And for over $10,000 for 11 windows I expected a much higher quality product.

Conclusion:
If I hadn't gotten the grids half my problems would have disappeared so if you're not in the market for that look then maybe they're worth a shot. I still think the crappy engineering and other issues I mentioned are enough reasons to shop other brands though. If I ever replace the windows in my house again I won't be buying Pella Windows.


Installing A Full Size Dishwasher In Old Shallow Cabinets

Despite what a lot of people told me, a 22.5" deep Bosch dishwasher will fit under some shallow cabinets that were standard on older houses.


Bosch's specs claim the unit has a 22.5" depth (with door) but everyone I talked to (at Lowe's and even Bosch) told me it needed the standard 24"W x 34"H x 24"D opening because the 22.5" dimension didn't include the door or that it needed room for the waste hose but that's not necessarily true. After checking various engineering drawings and specs I found on Bosch's European sites, I took a gamble (after making sure I could return it if it didn't fit of course) and it paid off. This unit fits quite well in my shallow 1940's 20.5" deep cabinets and it doesn't stick out any more than most other brand dishwashers installed in standard depth cabinets do. 

Keep in mind this older style kitchen doesn't have "drywall" installed behind the cabinets so I had a little bit more depth under the counter than you would measure on top of the counter, if that makes sense. The cabinets were actually installed to the wood studs, then "drywall" was installed around them. But seeing as you've made your way to this page, I'm guessing your cabinets are installed in a similar manner.

So anyways, people with old houses and no cash for new cabinets/counters can rejoice because most Bosch units (with a claimed 22.5" depth) will fit without sticking out too much. Remember to do your homework though and check the technical drawings for your particular model and make sure you can return the unit if it doesn't fit. Also, if you'd like to read my thoughts on the dishwasher itself, you can find my review here.

Update: my model isn't available anymore but Bosch has pretty good drawings on their spec sheets showing the true depths:

http://www.bosch-home.com/us/products/dishwashers/built-in-dishwashers/all-dishwashers.html

Anything with a 22-7/16" depth is the same as mine and can be pushed all the way back as long as your drain hose can exit out the left or right side (under that little overhang) as shown by the arrow:


As you can see it still sticks out a little but I find it looks intentional and not out of place. The top of the control panel is actually a small bit recessed under the counter. Also, since doing this install I've been paying more attention to other peoples' dishwashers and I've noticed even under full size 25" counters, most dishwasher stick out at least as much as mine.


Here are some random pictures showing the install. Sorry for the lack of a real writeup. And if you're a cabinet maker, sorry for all the cringing that will ensue from looking at how I did this...

Pretty freakin' ugly.


Looks like the previous owner was cool with a poorly caulked sink. Thanks, Dick.


Looks like Dick was here...


Here you can see how the cabinets on old houses (well, mine at least) were installed right up against the wall studs. Luckily, this gives you a little bit more room to shove the dishwasher back. 


An oscillating tool (Dremel Multi-Max) is probably the most versatile tool you can own


I put down a piece of laminate that was ever so slightly angle up in the back so that if the dishwasher ever leaks, it'll leak out the front and I'll see it.

Don't laugh at my ghetto cabinet walls.


Hope this helps. Let me know if you have any questions.

Framing Your HDTV

The Short:

Cut up those cheap $8 Ikea tables on a table saw and velcro them to your wall with 3M Low Profile Dual Lock.


How I Did It:
  • Measure how much you want the back panel to stick out around the TV and figure out how many Ikea tables you'll need to buy. Each table top measures 21-5/8" x 21-5/8" x 2" thick. I bought 6 but only ended up using 5. I ended up being able to cut the middle top and bottom pieces from one table. For reference, my TV is a 52".
  • Decide how you want to divide up the panels. I kept the top & bottom middle panels full width because the majority of the support in Ikea panels/tables is in the edges. The middle sections are just supported by paper so if I would have cut the edges of the middle panels I would have been left with only one support edge creating a very very fragile panel. 
  • Measure how much interior clearance you'll need for the TV side of the wall mount. 
  • Cut the panels on a table saw, making sure you keep the finish side up so you don't scratch it all up.

  • Add the 3M "velcro" to the back of the panels and to the TV wall. NOTE: Do not put too large of pieces on both surfaces. If you do, there's no way the 3M velcro will fully click together. I kept both the wall and panel pieces the same size as shown below but if you're having trouble aligning the panels or getting them to click together my suggestion is to keep the pieces on the panel small and stick larger ones on the wall. Also, it'll take some pretty hard hits to get the two velcro sides to click together so make sure put your velcro strips on the reinforced parts of the panels.

  • Draw on the wall behind the TV the outline of where the panel will mount to the wall. Your most important lines are you upper horizontal and left vertical lines since you'll be aligning your initial pieces off of these.
  • Starting with the upper left side, adhere the panel to the wall, making sure it's level and aligned with your lines.
  • Next install the rest of the panels working in a clockwise fashion - upper middle, upper right, lower right, lower middle, lower left.


  •  If you were careful and/or lucky the lower left will line up with the upper left.


  • Aaaaaand, all done.


There are a bunch of different ways to frame your TV. A full sheet of plywood or MDF would have been easier but much heavier and I would have had to mount into wall studs to support it. And then I would have had to paint it a glossy red. These Ikea tables are cheap and the 2" thickness was the exact measurement I needed to fill in the large gap left by the fully adjustable HDTV wall mount. 

NOTE: Depending on your wall mount you will lose a few degrees of pivot since the edge of your TV will now bottom out on the frame rather than the wall. This shouldn't be an issue for most living room setups though. 


So yeah, good luck. Oh, and if you're wondering, the wall mount is a Sanus similar to this one. And please excuse my fat (by today's standards) TV. It would look much better with a sleek edge lit one...

Here are some more pictures:


Building A Sturdy Half Wall Bar Top

This seams basic but I had trouble finding much info on building sturdy half walls. Everything I found involved mounting them to cabinets or benches for stability but I didn't have the room for that. So yeah, here's how I built my half wall:


Construct Half Wall 

Build your wall up like any normal half wall and make sure you have a secure mount to your king stud and subfloor (floor joists if possible). The double top plates probably weren't necessary.


Screw 3/4" plywood into all the studs, especially the king stud and the floor plate. I even ran some long deck screws diagonally down through the floor plate and into the sub floor. 3/4" thick probably isn't necessary. You could probably get away with 1/2" if you're trying to keep the wall thinner.


After all your electrical is ran, skin the other side in plywood making sure you have a nice solid mount to your king stud and floor boards. I know this won't give you the best accessibility for electrical mods down the road but I know no other way unless you're okay with a slightly wobbly wall.


Test out the rigidity of your half wall by drinking a beer on it.


Installing Counter

I really wanted a sturdy bar top for it (and I didn't know if I was going to use quarbles or not yet) so I designed a 12 gauge sheet metal bracket to mount the butcher block top to. I have 2 more of these if anyone wants them. Or I can send you the CAD drawing...


 Shim the bracket to make sure it's level. (Plywood removed so I could install T-nuts for the corbels I decided on using.)


Fully install the bracket to make sure everything's level. I had to notch channels in the top plate for the bracket flanges.


Corbels test fit so I could pre drill the holes and install the T-nuts in the back of the plywood. This is probably not the best way of doing this but once again, I wanted to make sure it'd be strong and not just a pointless aesthetic piece.


Remove everything, reinstall plywood, attach drywall, mud and paint.


Bolt bracket back up, once again making sure all is level.


Bracket was designed so the butcher block could be blind screwed and removable.


 Stain and install butcher block.


Reinstalled corbels. I also drilled vertical holes and ran wood screws up into the butcher block.


Installed trim, filled and sanded the holes. You'll notice this of course eliminates my ability to remove the butcher block later. Oh well, wanted it strong...


 All caulked and painted (with electrical protector bracket installed).


 So yeah, nothing too fancy. It's sturdy (I danced on it - no wobbling) and doesn't take up much room. Here's a finished picture with the electrical covered.